Blog • Insights
Answers to Your Google Analytics Questions
“How should Google Analytics NOT be used?”
Knowing how to use a tool is almost equal in importance to knowing its limitations. This first, and most important thing is to remember that site usage statistics can not tell us how a user is feeling, or what their motivations were. Did a user bounce because the design was bad? The content too long or irrelevant? Or because the page didn’t load fast enough? We can make educated guesses, but analytics will never fully replace usability testing.
The other limitation is user specific tracking. Google’s User IDs is bringing Google Analytics closer to this, but there are much stronger products in the market to help map individual’s behavior to outcomes.
“What is the benefit of using Google Tag Manager and how do you implement it?”
Google Tag Manager has really revolutionized how easily Google Analytics can be customized and has taken analytics updates out of the traditional production release schedule. For those less familiar, Google Tag Manager works in conjunction with Google Analytics to inject code into the site, allowing you to add custom events and custom dimensions without the assistance of a developer. While Tag Manager does make it easier, it is not necessarily easy to get started. It’s important to have a strong understanding of how Google Analytics event tagging works, a working knowledge of HTML/CSS, and basic javascript. Below are a few of our favorite resources for getting started with Google Tag Manager.
- 8 Reasons to Start Using Google Tag Manager
- A Beginners Guide to Google Tag Manager
- Simo Ahva’s Blog (The very best resource for Google Tag Manager implementation questions)
“What is the best way to tell what people click on for a given page? In-page analytics seems imprecise. Is there a better way?”
Historically, (and how GA currently performs out of the box) Google’s in-page analytics was pretty shoddy. It was only able to say how often a URL was clicked, so if there were multiple links to the same page, it was impossible to tell how often each was clicked. And if you were looking to see how frequently the nav was clicked… good luck.
Enhanced link attribution was launched within the last year and seems to significantly improve this existing functionality. It requires two steps for installation, checking off the “enhanced link attribution” feature within the GA Property Settings, and updating the GA code within the site.
The power of the enhanced linking tracking is limited by how unique each click element is tagged within the site. If each clickable element has a unique class or ID associated to it, GA can quickly tell how often it was clicked. If there were multiple clickable elements within a div, and only the div has an ID, then GA will report a range of clicks for the elements.
Alternatively, you can add click events for specific feature types within your page template, allowing you to track how frequently each slot was clicked rather than how often a specific slot. This would require a bit of advanced click events to be installed within the site.
“How can I trace a single user path from the time they arrive onsite to the time they leave?”
Sorry, you can’t. The strength of Google Analytics lies in it’s ability to aggregate user’s behaviors based on similar attributes, as mentioned before, tracking the behavior of individuals is not a priority for the product. That said, it is possible to look at audiences and identify trends. I think of this as being the opposite of a funnel- rather than tracking the path we wanted users to take, we track what path they took.
STEP 1: Identify your segment
Determine what users do you want to examine. First time visitors? Individuals from a specific social media campaign? Those who entered your site through a specific landing page? Individuals attending a conference? Or congressional staff? Once you know who you want to focus on, you’ll need to create a segment that reflects that group. Learn more about creating and applying segments.
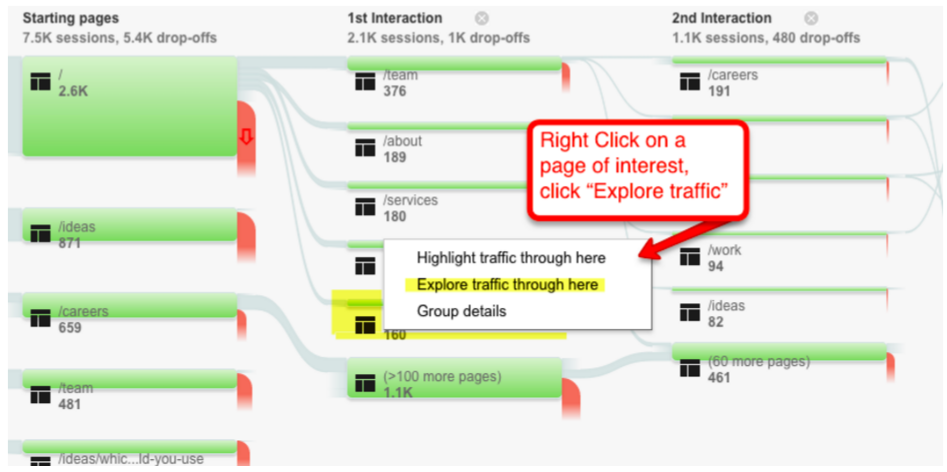
STEP 2: Review the user flow
Determine which page you want to start examining. If that page is already included within the default view, simply click on it, then click, “Explore traffic through here.”
STEP 3: Drill down to the pages you are interested in
If the page you are interested in is not currently included within the view, click into any page as noted above and then click on the pencil.
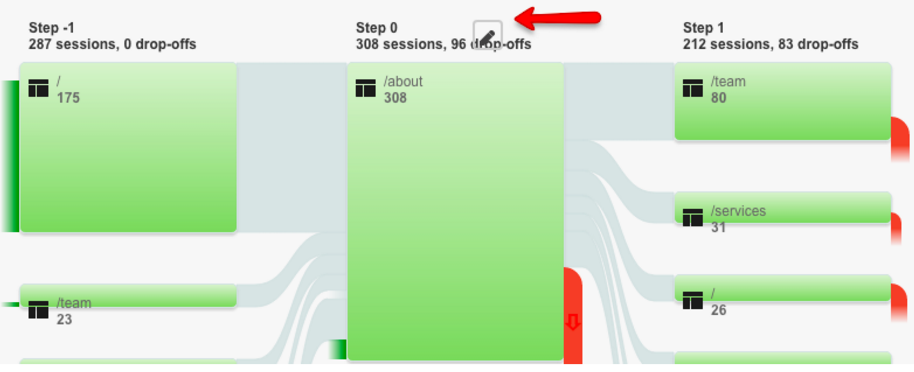
Then add in the URL of the page you are interested in and click apply:

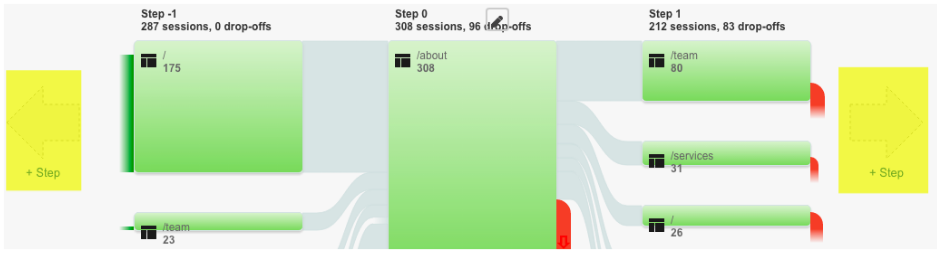
STEP 4: Follow the pathways
Now that you are at your starting point, you can click the “step” arrows on either side to follow where users came from of where they went.
Examining natural user flows or the “cow paths” of your site can help you get a stronger understanding of how people are using your site prior to and after completing key tasks. Using this knowledge, you can “pave the cow paths” by including easier navigation to key content.